Sunday, March 17, 2013

My 3rd Class - Cartoon Cakes


This week, we are supposed to learn chocolate piping of cartoon or any pictures that we want. So hubby requested for Man U logo since his birthday was coming and I could do that for his birthday. I initially wanted to try out Thomas for Rayshon birthday but decided to go with Man U as I don't want to come home with my gal complaining why no princess!! 

So I traced 2 pieces of the logo on a tracing paper, baked a orange chiffon or sponge cake as your wish. (Cos I feel the texture is somewhere between the both) I actually wanted to cream the cake with whipping cream but I don't know why my whipping cream curdle. So fed up.. So I have to take out my butter and go for SMBC.


I had a hard time creaming it as whipped cream is so smooth and much easier to cream as compared to buttercream. Now I knw why outside bakery uses whipped cream or fresh cream! So it's either I gotta put up with RG's comment or kanna 'scold' for my badly creamed cake. Never mind then, so long my logo is good!! All the attention will be on that instead. Ha~

Unfortunately, I didn't managed to go for the class as something happen at home. Luckily Angela, Sally & Cheria from MFWL is kind enuf to take video/tips and send to me, allowing me to have a chance to try it out at home.. Thanks dear. 

Pardon the lousy work, it's the WHITE compound that I fear to work with and also the small image tt I can't pipe the details nice nice lo.. It must be a big cake la.. Tis cake is only 7-8" big..

Method to pipe/transfer:
1) Melt the chocolate compound
2) Fill piping bag or using the tracing paper to make a piping bag. Cut a small hole
3) Get ready the 'traced' picture that you are using and pipe on the side which is without the pencil/pen marks. (Picture will be pipe opposite image)
4) Bring cake out frm freezer that is hard enough for you to transfer image
5) Put your picture, chocolate piping facing down and lie flat on cake surface
6) Using spatula, brush across to make the piped chocolate 'stick' on cake and slowly remove. Continue to press with fingers or spatula as u peel off tracing paper if the chocolate never stick on cake
7) You can use piping gel to colour your picture (I don't have colored gel as I attempt at home with tips my classmates)

Thursday, March 14, 2013

My own version of Ngoh Hiang


Been wanting to make my own Ngoh Hiang but couldn't find the 'skin' as I seldom go to wet market. So that fateful day, I went to Serangoon Market for lunch and decided to cook some Yong Tau Foo and I was buying some yellow noodles when I suddenly saw it. The SKIN!! Yes, so I took a packet.


After thinking about it for days, I decided to put it to use. I tried to think what could be the ingredients - Meat, Prawn, Carrots and what else???? So I came up with my own version. The process is so tedious. Wrapping, steaming the deep frying them. And yes, my hardwork paid off. It's yummy!! Hubby and kids enjoyed them and my son kept asking for it, most important, Grandma give the thumbs up!

In the midst of cooking, I baked Pandan & White bread loaf. Yummy.. I wrapped some with Kaya & Nutella..


Ngoh Hiang
100g Minced Meat
1/2 Carrot, chopped
1 Stalk Spring Onions, chopped
6 Medium Prawns, diced
1tsp Five Spice Powder
2tsp Lt Soy Sauce
2tsp Sesame Oil
Dash of Pepper
1/2tsp Cornflour

1) Mix all the above ingredients
2) Cut the beancurd skin into desired size, wipe away all the salt with a clean wet cloth
3) Wrap ingredients in the amount of filling as per preference
4) Steam for 10min, leave to cool
5) Cut into smaller pieces, dip in beaten egg and deep fried til golden brown

Wednesday, March 13, 2013

Another attempt at customised cookies


A dear fren of mine recommended her fren to ask me for customizing a cookie for her son's 7th birthday. Initially I was quite worried as I wasn't confident if customizing cookies as it isn't my forte to work with small items.. Lol~ I wanted to pass the deal to another baking fren who started her own shop but she was tied up so can't take the order so..... Yes, it falls back to me!

I decided to try the cut out cookies recipe from Angela and the icing recipe that I used previously. The recipe is similar to what Angela is using too. I modified slightly by adjusting the sugar to using caster sugar and brown sugar to 1:3 proportion and cut back the sugar by 40g from original recipe. I did 3x recipe and managed to have 45 gingerbread boy cut outs. It pays to have extras, from my past experiences..


So after cooling them, I pipe out the white shirt. The next afternoon, I do up the shorts. While I leave them to dry up, I proceed to make little books that says 'Bryan's 7' to be 'glued' to the little boy. I seriously hope the mummy will be satisfied and the little boy and frens will be happy to receive them.

Cut-out Butter Cookies (modified from AngelCookBakeLove)
450g Butter, soften
180g Caster Sugar
60g Brown Sugar
225g Eggs, slightly beaten (approx 4.5 eggs)
1tsp Vanilla extract
1050g Cake Flour

1) Beat butter and sugar til pale in yellow
2) Add in beaten eggs and mix well
3) Fold in flour using spatula
4) Chill dough in portions that you can to work with each time with cling film. Keep refrigerated for at least 15mins
5) Shape accordingly. Bake at 180deg for 20-30min or until browned.

Sunday, March 10, 2013

My 2nd Class - Basket Weave


Today is my 2nd class, so excited. RG told us to start creaming the cake once we reach cos he will be focusing on the piping technique for the basket weaving. Today I didn't take any videos, as I am feeling a little low on the sugar so I just learn visually.. Hee..


I am using a chiffon recipe today, but I beat the whites til soft soft peak, like 'flowy' consistency to make it less 'chiffon-y', kinda a bit between sponge cake and chiffon. I was kinda worried as I spoil my 1st cake using a sponge cake recipe by Aunty Yochana. I was rushing thru cooking dinner and preparing bread dough as well as baking my sponge. The cake end up burnt, crumbly and i had to feed it to Mr Bin! So I use my previous recipe and I ended up cooling the cake til almost 1am++.
Luckily the texture today is good, taste is good, and it goes well with the fruits and all. Hubby, grandma and the kids, even my neighbour gave Thumbs up!

I bake it into Longan cake, replacing the orange juice with Longan syrup using the Orange Chiffon recipe tt I baked previously. . I also found a video you can refer to it, very simple.

Next class will be cartoons, I can't wait!! Stay tune!

Thursday, March 7, 2013

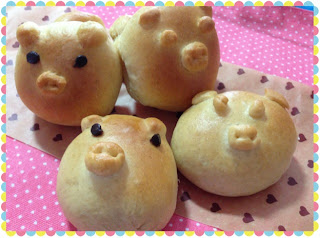
Little Piglets came to visit


Inspired by some members making cute little animal-shaped breads, I decided to cheer my little gal up with a Piglet bread for a start. I made 2 version, Kaya & Nutella Buns. I used 20g dough for the face and pinch out some to make the eyes, nose and ears. I wrapped the filling up before rolling them into a ball. So much fun and maybe next round I attempt other animals. 

Today I changed the proportion of Wholemeal to Bread Flour, 1:5, meaning 50g Wholemeal Flour + 250g Bread Flour. Still soft and nt dry. Nice~ You may refer to the recipe here.

Tuesday, March 5, 2013

Tau Suan w/Home-made Dough Fritters


What's best to go with Dough Dritters else than Bak Kut Teh? Tau suan!! Been craving for this for many weeks, bought the mung beans and kept on putting it on hold. First, cos no time. Secondly, only me loves this dessert and worried my 1st attempt at cooking it will not PASS. I got very critic food tasters at home. Lol~ And since my fritters is a success, I must make my Tau Suan!

A lot of variation on the net but I decided to come up with my own proportion. Ingredients is about the same, Pandan leaves, rock sugar, mung beans and potato starch. I boil the amount of water + Pandan syrup according to the amount of mung beans n water proportion. So, here you go, my humble experiment.

Tau Suan
250g Mung Beans
800ml Water
2 knots of Pandan Leaves (approx 4-6 leaves)
Rock sugar to taste
Potato starch

1) Soak mung beans for 10mins, steam for 30mins
2) Bring water to boil, with Pandan leaves. Add rock sugar to taste
3) Add potato starch to thick consistency of own preference
4) Pour in mung beans and stir well
5) Serve with dough fritters.

Creaming & Piping Technique (Mar 3 2013)


Sharing some tips given by my 'teacher' in class. Really very good tips and advice given. If you have the time, you should go for his class. You can ask him and he is so ready to help. =)

As the video is too long on the creaming portion, i am dividing it into 2 clips as I cant upload properly from yesterday evening til 2am!!!! So please pardon the video, and also my 1st time compiling the videos, so it isnt linked up very well, please also excuse me for that. Enjoy the video..

Here is video on using Nozzle 22, a various design u can use that nozzle to pipe.. =)


****pls note, can only be viewed via PC..

Mini Dough Fritters


I always have a problem when I cook Bak Kut Teh for dinner, I don't have a source of Dough Fritter near me cos I loves to dip them in the soup. Now my kids, seeing me eat like this, both of them also enjoys eating them in the soup too.. As the saying goes, monkey see monkey do!! (But I am not monkey hor)

I was afraid of failure cos it seems like so difficult and I don't have ammonia as per the recipe calls for. So I jus take a gamble n tried it. Yeah, I succeed. It taste like those selling outside and less saltish and it is fried with 'fresh' oil... Yummy. So now I don't have to worry when I wanna cook Bak Kut Teh!! 


Dough Fritters (adapted from Angie's Recipe)
**i halve the recipe for 8 mini fritters, about 10cm long
125g Plain Flour
1g Baking Soda
1g Baking Powder
2g Salt
78ml Lukewarm Water

1) Mix all ingredients in the bowl, except for water. 
2) Drizzle in water slowly as u mix, into a non-sticky and smooth dough. Rest for 1hour
3) Knead again and rest for 45mins
4) Heat up oil and cut dough into 5-7cm long, 2cm wide. Stack 2 pc together and use a skewer to press a line in the center on both sides.
**i sugg doing them up b4 heating oil as it fries up very fast
5) Deep fried til golden brown

Monday, March 4, 2013

Sweet Potato(Purple) Chiffon II


Baking this chiffon again as my pregnant neighbour told me specifically that she had a craving for it. So had been searching for the purple sweet potato and couldn't find it. Ended up with Grandma finding it during her 1-day trip in Muar. 

I used back the same recipe from eggplant's blog and did a 15cm chiffon and at the same time, using the same recipe for Pandan flavour. So I baked some into mini cups liners that I bought from Ikea over the weekend. Tall and slim chiffon, nice!!


Sweet Potato Chiffon (adapted from eggplant10)
Cake Batter :
3 yolks
40g Oil
Water 60ml (I replaced with milk)
65g mashed potato (I replaced with pandan extract for Pandan flavour)
15g sugar (reduced to 10g)
1/2tsp Baking soda
60g Cake Flour

3 whites
45g sugar (reduced to 40g)
1/2tsp tartar (I omit)

1) Mix all cake batter ingredients well
2) Whisk egg whites and sugar to peaks
3) Fold in 1/3 of whites, fold in remaining gently
4) Bake at 180deg for 30-40mins

My 1st class related to my fav hobby - BAKING

Was informed by some of the members in MFWL about Richard Goh starting a class on every Sunday afternoon about creaming technique as well as decorations. I immediately decided to sign up after discussin the childcare arrangement for the kids with hubby, so excited was I. I waited patiently, 3rd March 2013, my first class!!

So, this first lesson, Richard Goh roughly tell us what we expect to learn from the 8 sessions ad briefly explain on the 'rules' of class. Basically no harsh rules and he is a very friendly and jovial teacher to have. I loved the way he teaches the class, I feel like I am learning frm a friend rather than a teacher. That really makes it stress free.

So for the class, we need to bring our sponge for every lesson. In a hurry, I decided to goggle randomly and use this recipe from Little Teochew. The recipe is light, soft and most. It has a hint of buttery taste but I find a little sweet though I reduce 15g of sugar from the original recipe. So since I have 8 sessions, I gonna try different recipe each week til I get 1 that I really liked. 

Today, I made a real simple design as I was really caught off-handed on the decorating part. As for creaming, at least I learnt that we should out the cake bottom up instead of front up. Reason, cos u won't get so much crumbs when creaming the cake as compared to using the front up. And it is, I don't have any crumbs.


As for the creaming technique, patience & slow and steady is the way to it. Learn to listen to the tips and slowly try to master in ur own ways. And I should have taken a pic of my 'naked' creamed cake before deco so that I can see if I got improve after 8 sessions. Shall do from next class onward.

Oh, I have some videos to share too. Once I have time to sort it out, I will post on my blog to share the tips from Richard Goh in creaming the cake. Stay tune.

Sponge Cake (adapted frm Little Teochew)
- 4 eggs
- 100g cake flour
- 100g castor sugar
- 12g spongecake stabiliser (I omit)
- 25g milk
- 90g melted butter 

1. Put all the ingredients except the melted butter into a mixing bowl.
2. Beat everything on high for at least 7 mins until stiff and creamy (aka “ribbon stage”). 
3. Add in melted butter at this stage and mix in thoroughly.
4. Pour into a 9-inch lined baking pan and bake at 190 degree celsius for about 20 mins or until a test skewer comes out clean. When done, remove the cake immediately and leave it on wire rack to cool.