Sunday, April 14, 2013

7th Class : Doll Cake


Today is my 6th class, so sad that my class gonna end soon in another 2 weeks time. =( I seriously had so much fun with all the baking friends there - Angela, Eileen, Cheria, Shirley, Sally, Lynette, Lois and many more there. I gonna miss the times we spent laughing, helping out when we had the classes, plus all the silly jokes.

Back to today's class, we have to make a doll cake and so nice that I can give it to my gal, who was running a fever that afternoon, just before I leave the hse for the class. I left with a heavy heart, calling and checking on her occasionally. 

Today, I used a modified recipe from the previous sponge recipe and I call it - Strawberry Yogurt Chiffon Cake. It is light, taste of strawberry, not too sweet and still moist and yummy. And I got a tub of strawberry filling from Angela (she got it from 1 of her recent msia trip) and it goes very well. And thanks to her, I got a layer of chocolate sponge from her as my 8", 6" & 4" doesn't add up to be tall enough. Thanks a lot, babe!!


I decided to do frills, using yellow and blue instead of the usual pink, purple that you see. And I love the combination of the 2 colors, and I use pink for the corset and realized I actually piped too thick so my doll was a bit on the 'chubby' side. Nonetheless, my boy says 'Barbie' when he saw it and my gal was happy and says 'it's my princess' and hubby kept saying 'good job!'...


As for how to make and cut out the 'dome' for the princess dress, I have a step by step guide written here.

Strawberry Yogurt Chiffon (I won't call it my recipe but I reference to this recipe)
For 8", 6" & 4" (around height of 1.5")
2/2/1 yolks
44g/44g/22g Cake Flour
23g/23g/12g Oil
30g/30g/20g Yogurt *i use strawberry yogurt
5g/5g/2g sugar

2/2/1 whites
44g/44g/22g sugar

1) Using Chiffon method

How to cut out a Doll Cake


With reference to RG class, I have a simplified step by step guide of how to cut out and a short video of how to cut and cream the cake. According to RG, you can either crumb coat and cover the whole cake with piping, which is what I did to dress up the doll or you can use a layer of cream to work as the base then pipe a little to dress up too. It's 2 options that we can work with. So, here you go.

Things to prepare:
8-9" Sponge, 3" height
6-7" Sponge, 3" height
**i use 8", 6" & 4"

1) Cut the different cakes into 2 layers and fill with fillings.
Stack the 2 cakes on top of each other


2) Use a small round cutter, use it as a guide and press onto the center of the cake on the top
Put the knife, 45degree to the 'marking' and cut slowly, turning the turntable slowly at the same time.


3) After cut out the dome, make some adjustments if you feel it's not curve or straight enough. Then do the creaming/crumb coat. Once done, cut a hole for the doll if you using the whole doll + legs or jus poke the half-body doll onto the top.  You can start decorating now.

Thursday, April 11, 2013

New York CheeseCake II


Just a day ago, I asked my mum to bring my cake to her collits for tea break as I have been having cakes for the past 5 weeks and I think we are very scared now. LOL~ And the next day, I received a phone call from my mum, her collit is asking if I know how to make Cheesecake. Ha~ 

I have used a recipe from EllenaGuan previously and it is the normal method of adding in eggs to the 'cream' batter and it taste really good. Both the New York and Oreo version. So this round, I decided to use the recipe from Vivian Pang which uses whites beaten to peaks then fold into batter. I wonder what the difference it is. And the best part, it's gluten-free. Yumm...

As the previous bake is quite a while ago, I can't remember in details but it is like eating Ice cream Cheesecake, not very 'cheesy' or too overwhelming that you will feel that you are suffering from cheesecake overdose. As for this recipe from Vivian Pang, I would say the texture is very smooth, rich in flavour and yet not too overwhelming. It taste like those you can get from Starbucks or TCC. Nice too! It's definitely a keeper! Pls make 1 at him..... =)


On top of my order, I made 2 4" again. (Yes, I am. Infatuated with my small tins.) 1 is plain NY Cheesecake and 1 Marble Chessecake w/Oreo cookies in it. You can refer to my noted on how I use 1 recipe for the 3 cakes. But pls be hardworking if you have a small oven like mine. Cos I divide them into 2 different bakes, which means I spend more than 3hours from prep to baking them. But I bet on it, the end results, you won't regret.. 

New York Cheesecake (adapted from Vivian Pang Kitchen)
*I use the recipe for a 6" & 2x 4" cake tin*
Base - 8" cake tin, grease tin all over and line
(I didn't follow the amount in the recipe as I wan a thicker biscuit crust cos I like the crust a lot!)
Marie biscuits, crushed
Butter - melted
Mix all the above ingredients and press onto the cake tin base.

Filling:
400g Cream Cheese
20g Butter
20g Sugar
*i added a few drops of lemon juice*
3 yolks
1Tbsp Vanilla Extract
30ml milk
30g Cornflour
3 Whites
60g sugar
1/2tsp lemon juice

1) Cream cream cheese, butter and sugar til smooth.
2) Add in yolks, vanilla, milk then cornflour in the same sequence
3) In a clean bowl, beat egg whites til foamy, add in lemon juice & 1/2 sugar, contd beat til glossy. Then add in remaining sugar and beat til soft peak
***I just add all sugar and lemon juice and beat together til soft peaks*
4) Fold in 1/3 whites to batter, then pour batter into remaining whites. Fold gently
5) Steam bake at 150deg for 25mins, then lower 120deg for another 30min.
6) Leave to cool in oven, then chill overnight. Remove and serve.

Notes:
**i divide the recipe into 2 and bake twice as my oven is too small. Here is my variations**
I used 1/2 recipe for the 6" for a NY Cheesecake version.
And use 2 yolks and 2 whites instead of 1.5 each.

I took another 1/2 recipe to make a NY Cheesecake and Marble Cheesecake for the 4" each.
Same using the 2 yolks and whites instead of 1.5 each
I took a few spoonful of batter and mix with coco powder, lay some Oreo cookies on the crust, then make into Oreo Marble Cheesecake. Yummy!!


Wednesday, April 10, 2013

IHCC - Broccoli, Carrot and Quail Eggs (Yotam Ottolenghi)


The other day at Cold Storage, I was searching for Betty Crocker Pancake mix when I come across this pancake mix - Marie Callender's Corn Bread/Muffin Mix. It is selling at $1.20, I think, clearing stock as it is expiring on the 14th this month. So I took a pack to try and intend to make Roast Chix at home, to imitate those you have at Kenny Rogers. Verdict - it's not bad for a quick n fuss-free cornbread!

As I was decided what else to go with the Roast Chix and Corn Bread, salad was my 1st choice til I stumble upon the post by Joyce of Kitchen Flavour. That was my 1st encounter with IHCC (stands for I Heart Cooking Club). It is a group of cooking lovers who have a theme and free choice of what recipes to use, that features or is from the guest chef that is chosen. I briefly browse and saw this - Asparagus with celery and quails' eggs. 

I was intrigued to make this, simply toss on olive oil and sprinkle black pepper over blanch vegetables.  And I replace the apsaras and celery with broccoli and carrot. It is light, simple and yummy. I didn't use the olive oil ultimately, I toss it in the Chix oil from roasting the Chix, to get some of the marinate 'taste' from the Chix. Then I topped it off with black pepper and I am done.

The combination of Roast Chix, Corn Bread and Broccoli, Carrot & Quail Eggs salad goes very well. Light and flavourful. I would definitely recommend this to lazy ppl who want to impress guests that they invite over for dinner. Haha~

I am submitting this recipe to IHCC on the theme of 'Loving the Leaf' by guest chef Yotam Ottolenghi

Aparagus, Celery and Quail eggs (adapted from Guardian.co.uk
400g medium asparagus, woody ends removed (net weight)
Olive oil
¾ tsp celery salt (or fine sea salt)
12 quail eggs
10g celery leaves, roughly chopped (ie from about one head of celery)
2 tsp lemon juice
Black pepper
1) Cut and blanch vegetables in water. Using the same water, put quail eggs in to boil
2) Cook for about 5mins, pour away the hot water and soak in cold water.
3) Using the same pot after roasting the Chix, put blanched veg into pan and grill til you get charred mark. Toss over lemon juice and black pepper. Serve warm with Chix.

Tuesday, April 9, 2013

Chocolate Ganache and Chocolate Sponge w/Strawberry Cake


My younger sis requested for me to guide her in baking a heart-shaped cake for her hubby's birthday. Kinda worried I can't do a good job as she is comparing with Awfully Chocolate. Oops.. I suggested to put Nutella spread in between the layers, topped with strawberry and then cover with chocolate ganache. At the same time, I also baked 1 more mini cake as I am so infatuated with my new mini tin. Ha~

First, wanna try out the cake as she is bringing home to cut. Secondly, I wanna try to tweak the sponge recipe a little and bake a chocolate sponge out of it. And so, I can have a soft and fluffy chocolate sponge recipe on hand too.. 

The cake is bittersweet from the coco powder even though I didn't reduce any sugar. And it is soft, goes well with the strawberry filling and chocolate ganache. Very light and not too heavy as Awfully Chocolate. Definetely can go for a 2nd serving. I hope my sis will like the cake.. =) And for a 1st timer, someone who doesn't bake, the deco is considered good right.


Chocolate Sponge (adapted from prev post)
*Baked a mini heart-shaped and mini cake, plus a cuppie
4 yolks
87g Top Flour *I use Cake Flour
47g Oil
53g Milk
10g sugar

4 whites
87g Sugar

1) Using chiffon method

Chocolate Ganache (adapted from Joyofbaking)
227g Bittersweet Chocolate, chopped
189ml heavy whipping cream
28g unsalted butter

1) Melt all above, just about to boil and pour over center of cake
2) Slowly scrap ganache to cover whole cake. Leave to set.


Monday, April 8, 2013

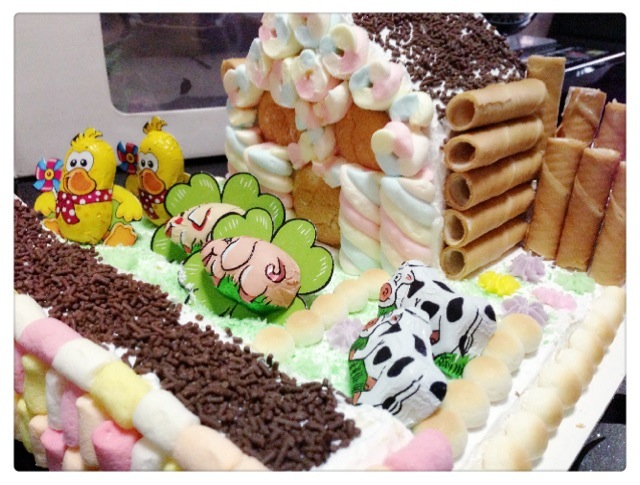
How to build a 3D House Cake


After attending the class, I managed to do up my 3D House Cake thru many frustrations. Why?? It is no easy feat to cream the cake and assemble, the deco, how to deco and so on.... 

First, you need a 8-9" Butter Cake with a height of about 2", and it is for the house then another 11" Sponge Cake with a height of about 3" for the garden. Both are square cakes. So here you go, the steps with photos to guide. You can refer here for recipe that I used for this cake.

Photos are with courtesy from Angela of CookBakeLove, she will be posting up her 'house' soon.. Stay tune and do pop by her blog too.. And thanks Angela!!

1) First, cut the top of Butter Cake level. 
2) Then cut the cake into even halves.

3) Spread cream and filling on 1 of the halves, and place the other halve on top.

4) Divide the cake, into thirds, cutting out 1 of the thirds. Take it out and place it facing UPWARDS. Cut diagonally.

5) Put the 2 slanted slices that you just cut and place it side by side, to form the ROOF. Place on top of the 2-thirds that is uncut and place the ROOF on top.

6) Spread cream on top of the Sponge for the garden thinly, but not exposing the cake (No need too thick as we will be sprinkling the colored dessicated coconuts on top later. Then place the house on preferred location on the 'garden'.
Cream house lightly then you can start to decorate the house and garden. 

Sunday, April 7, 2013

Bake Along #42 - Deep Chocolate Pound Cake (5th Class - 3D House Cake)


The theme for Bake Along #42 is Deep Chocolate Pound Cake, plus considering for this Sunday's class we need to bring a Butter Cake & Sponge so I decided to have something for a change in the flavour of the cake and so I am baking it to kill 2 birds with 1 stone.

I am substituting the sour cream with yogurt, whole milk with HL Low Fat Choc Milk, omit the Kosher salt and considering to omit honey too. So here I go, hoping to do a good job out of it. But sadly, taste good but texture fail. Maybe I didn't do a good job with the creaming. Seems nt to have fate with Creaming Method for all recipes...

As for the sponge, I am using original sponge that I tried jus 2 days ago from here. Personally, I quite like this recipe.

For RG's class, we supposed to bring a square 11x11x3" height of sponge for the 'garden' and a 8-9"x2" height of butter cake for the 'house. Due to my small oven, I had a constraint so I came up with a 11x10" garden to go along with a 8" butter cake. Am glad it still turn out nicely done. 

Review for the Chocolate Pound Cake is light and fragrant but it is nt my hubby's favorite, it doesn't bring in good review from him. Hahah~ For me, I love it, except for texture.. 

Happy baking everyone, I had a lot of fun! 


Deep Chocolate Pound Cake ( adapt frm Bon Appetit)
- I baked in a 8x8 square tin
2 1/4 cups all purpose flour
1 teaspoon baking powder
3/4 teaspoon coarse kosher salt *omit
1/4 teaspoon baking soda
1/2 cup sour cream *replace with yogurt
1/2 cup whole milk *replace with low fat choc milk
1/4 cup unsweetened cocoa powder
1/4 cup honey *omit
2 tablespoons boiling water
3/4 cup sugar
1/2 cup (1 stick) unsalted butter, room temperature
2 large eggs
1 teaspoon vanilla extract
1/2 cup mini semisweet chocolate chips
1) Whisk dry ingredients together, mix sour cream, honey in another bowl
2) Sift coco powder in a bowl, add 2TBsp of hot water and honey and mix into paste.
3) Beat butter and sugar til fluffy, beat in eggs 1 at a time. Add vanilla extract and chocolate paste
4) Add in flour and milk mixture, alternating both. Stir in chocolate chips
5) Pour in greased and lined pan, bake at 180deg for 1 hour.


I am submitting this post to 'Bake Along' organised by Joyce from Kitchen Flavours , Lena from Frozen Wings and Zoe from Bake For Happy Kids

Friday, April 5, 2013

Cake requested by a nice fren


I think I knew this fren when I was still schooling, maybe polytechnic time? Or waiting for 'O's results? I bet it was more than a decade and I seriously can't remember the details. Signs of aging. I remembered at that age, I feel that she looked like an Ah Lian and she tot that about me too. And we didn't really talk, until that fateful day. Ha~ Since then, we sometimes plan to wear same colour theme, or occasional catch - up after that, we sort of arrange same same clothing, went to take photo cards etc. That was the day... So long ago, when I was once young. 

Anyway, now we are both married and having our own lives. We seldom meet up but occasional what's app, FB or even buying me goodies when I was preg and craving to have what she eat and post on FB. I am so blessed to have a fren like her, seldom meet but lives in the heart.

So, her hubby bday is coming up and she want to have a fondant cake, with strawberry shortcake base. Considering the weather, the fondant and the cake, it is not suitable to do so. So with some advices from a nice fren, I decided to go along with her idea of using a cake board, same size as the cake, and prop it on top of the Strawberry Shortcake so that it doesn't come into contact with moist and have risk of melting. And it is my first attempt to have to use dowels/thick straws to support the cake board of fondant deco as if I am making a tier cake.


Overall, I am very pleased with the deco part, cake wise, need to find out from my fren. And I also use my human mould for the first time and it is not so easy to mould even though I used that. But still a fun and learning experience for me. =)

Vanilla Sponge ( given by a fren, so not sure where she got it)
6 yolks
130g Top Flour *I use Cake Flour
70g Oil
80g Milk
20g sugar

6 whites
130g Sugar

1) Using Chiffon method

Cream - I am using whipped cream
300g Whipping Cream
Sugar to taste

1) Beat whipping cream til stiff peak
2) Add sugar to taste


******Will update once I get more pics frm my GF and also her reviews on the cake*****

Thursday, April 4, 2013

1st Strawberry Shortcake - Mini Size


Last week or the week before, Angela asked if I wanna get anything from Daiso as she is going to the branch at Ion. So I asked her to let me know if got any new baking tools. And there she is, even with the very bad reception, she managed to send me Whatsapp for these 2 very cute mini cake tin with removable base. Love it. 

And since I am making a Strawberry Shortcake as requested by another nice, old fren, I decided to trial a mini one for my family to test out the sweetness etc. I was quite worried to use the tin as it is not non-stick and also not the dull silvery cake tin. In fact it is those shiny metal tins that I don't know if my cake will 'climb' well. But my worries were uncalled for as it rises nicely and bake nicely. *Yeah*

So I proceeded with all the tips learnt in RG's class to cream and do up the cake, similar design as to how the bakery present their version of Strawberry Shortcake. Considered 6/10? I hope to improve next round in terms of 'dolling' up the cake. Taste wise, yummy!!

Btw I am using the same recipe, but its 1/3 of the original recipe for 1 mini size cake. And I am using whipping cream this round.
Vanilla Sponge ( given by a fren, so not sure where she got it)
6 yolks
130g Top Flour *I use Cake Flour
70g Oil
80g Milk
20g sugar

6 whites
130g Sugar

1) Using Chiffon method


Tuesday, April 2, 2013

Cheat Version - Donut


Over the weekends, I went for some retail therapy to cheer myself, sponsored by hubby and I bought a donut pan as my gal loves to eat anything that is in a shape of donut. Bread, cakes or anything. With that colorful sprinkles, that will blow her away. 

So, I was browsing online for some recipes and came across this - Apple Cake/Muffin by ReeseKitchen and my sour gold kiwi immediately came to my mind. Ha~ I decided to replace the apple with kiwi, used my donut pan and then coat with melted choc, colorful sprinkles to blow my gal away.


After baking them, I was kinda lazy to melt choc but the kiwi really taste too sourish for me. No choice, the choc have to come out. So I dip the top halve of the donut in the choc, sprinkles the colorful sprinkles. Now it is sitting in the fridge to set. 

Overall, the choc complements the sour kiwi, taste good too. As for the cake, maybe my skill not so good, it is soft and moist but not good yet, in my view. But overall, my gal loves it... 

Kiwi Cake/Donut (adapted from ReeseKitchen)
2 eggs
60g sugar *i use 45g*
1 tsp ovelette / emulsifier *i omit*
130g cake flour / plain flour
1/2 tsp baking powder
150g apple, peeled and purée *i use 1 kiwi, chopped, approx 90g*
70ml corn oil

Melted Choc
30g chocolate chips
30ml milk
10g butter


1) Beat eggs and sugar til ribbon stage
2) Sift in flour and baking powder
3) Add in kiwi and oil mixture and mix well
4) Scoop into pan and bake at 180deg for 15mins, cooled
5) melt all the above for dip, bring mini cakes and dip, put sprinkles on top and fridge to set