Thursday, August 30, 2012

Lychee Hokkaido Chiffon Cupcake


I opened a can of lychee the other day to make konnayaku jelly for the kids. Had some leftover and thought it will be a good idea to make some hokkaido chiffon since lychee is my fav fruit and i will definetely eat my own bakes. So I went back to my recipe and reduce to 2 eggs, meaning i halve my recipe. So i ended up with 6 chiffons which is just nice for my small family to finish them in 1-2 days.
The bits of lychee in the chiffon, i love them. And i replace the water with the lychee syrup and also added lychee syrup to the frosting (as i run out of whipping cream to make the custard). Did a simple vanilla frosting with icing sugar, butter and lychee juice.
Try the recipe if you like lychee as me or be creative and add some of your favourite fruits..
Lychee Hokkaido Chiffon (recipe from previous post, adapted from Dequeen)
You will need:
(A)
2 egg yolks
25ml oil(i used canola)
30ml milk (**i replaced with lychee syrup)
35g cake flour
(B)
2 egg whites
30g sugar
The Preparation:
Sift flour.
Whisk the yolks lightly and add in the wet ingredients in (A) followed by flour till well mixed.
Beat egg whites till foamy with electric whisk and add in sugar gradually,beat till soft peaks formed.
Fold in 1/3 of egg white mixture into yolk mixture. Then slowly fold in the rest until well mixed,do not deflate the egg white mixture.
Pour into square cake cases.
The Baking:
Bake in a preheated oven at 180°C for 20-25 minutes.
Remove from oven cool on wire rack.
When cake is completely cooled,pipe in custard cream and dust with icing sugar.

Traditional Baked Mooncakes (II)

before return oil

before return oil - close up

Here is the part 2 of my traditional Mooncake post. I tried out Christine recipe and did it without the glaze. It gives a light shade of brown which I believe it will darken a bit after 3 days when it return oil. Reason being, I seriously don't want to spoil the hello kitty flawless face again. =)
This time round, I mould them carefully and tried 1 with the milk tea paste I bought from Kwong Cheong Thye. Can't wait for 3 days already. I'm a super big fan of milk tea, bubble tea blah blah..
And this time I didn't halve since 12 seems the right amount of mooncakes for me to make but I only manage to make 10 mini mooncakes though the recipe says 12.
Traditional Baked Mooncakes ( Recipe from Christine)
100 gm plain flour
60 gm golden syrup
½ tsp alkaline water (aka lye water), available at Asian grocers
28 gm vegetable oil
1. Mix all wet ingredients together in a bowl
2. Weigh flour and make a well. Pour in wet ingredient and mix to a dough
3. Rest for 40mins before weighing dough into 20g
4. Wrap with ready-roll 20g paste and mould
5. Bake for 10mins, cool for 10mins
6. Brush with egg wash then return to bake for 10mins 
*i didn't egg wash them so I baked for 15mins for a darker tone

MrsNgSK Butter Cake - modified


Kinda intrigued by Facebook friends, saw the pics of marble cake, makes me wanna make my own. But since I like this latest creation - Mrs NgSK's recipe and the type of texture yield, I decided to modify her recipe. 
Initially wanted a Chocolate & Butter combination, ends up with Chocolate, Strawberry & Butter combination. I like chocolate a lot, not for hubby though and my lovely princess love strawberry, therefore the 3 flavours. Didn't have any strawberries or strawberry milk, so I ended up using essence and a drop of pink. 
Using the same method, it took me extra 20mins to mix the additional flavours and also to mix the cake batter. Wasn't that well mix cos my hand so tired from the creaming of cake batter. Luckily the final product is yummy. Everyone loves it. 
Tri-flavour Marble Cake (modified from MrsNgSK)
230gm butter (salted), softened (cool at 18-20C, not glossy)
200gm eggs, no shell (4 grade B eggs)
50gm + 150gm sugar
200gm self raising flour, sifted.
60ml milk
1 vanilla bean, seeds scraped (or 1 tsp vanilla extract)
1 Tbsp Strawberry Essence
1 drop of pink
1Tbsp Cocoa Powder
1. Preheat oven at 180C (conventional). (I only use 170C). Prepare a 8 inch square pan. Line the base and grease the sides (greasing helps the cake’s sides to rise well)
2. Separate the eggs, and place the whites into a medium sized bowl (6 cup capacity)Beat egg whites until soft peaks, gradually add 50gm sugar and beat until stiff. Set aside.
3. Cream butter and 150gm sugar until pale and fluffy (KA speed 2-4 ). Put in vanilla seeds and and beat for a while. Put in egg yolks one by one and beat well after each addition.
4. Put in half the flour and mix on low speed until incorporated. Put in milk in 2 additions and mix until well incorporated. Mix in balance of flour.
5. Put half the egg whites in and mix on low speed. Pour the balance of egg whites in and FOLD.
6. Pour batter into pan and level.
7. Divide into 3 portion and add 1Tbsp of Cocoa Powder to 1, add 1Tbsp strawberry essence + drop of pink and leave the remaining as it is. Pour batter alternate into pan and level
8. Bake for 150 deg for 45mins

Traditional baked mooncakes


Had a small order for baked mooncakes and tried out 2 recipes, the first one is from Anncoo and tried another from Christine. Anncoo's recipe smell heavenly and it's soft, but I think I spoil it cos I used a kitty mould, and my bristle too hard so resulting in a lot of scratches on the faces. So sad.
I tried again with Christine recipes 2nd round and didnt glaze it. It looks ok, just a little faint for the eyes and nose. Which I am praying hard that after it returns oil, it will darken and make the kitty more obvious. 
So I am sharing 2 traditional baked Mooncake recipe. And to note, I halve both recipes.
Traditional Baked Mooncakes ( recipe from Anncoo)
Makes 12 mini - 20g paste & 20g dough

225 Hong Kong flour (sifted)
130g Sugar syrup/golden syrup
12 x 20g Lotus paste
4g Alkaline water
65g Peanut oil

4 Salted egg yolks divide into halve

1. I mix sugar syrup, alkaline water & peanut oil in a bowl. Stir them well
2. Put flour in a metal bowl, make a well and add in the above mixture
3. Using a spatula, I mix them up to form a dough
4. Rest for 20mins
5. Weigh paste and roll into balls with the egg yolks in them
6. Weigh dough after 20mins and then wrap the ready paste
7. Mould and put in baking tray, sprinkle water and bake for 10mins in pre-heated oven
8. Cool for 10mins and glaze with egg (1yolk + 1tsp water)
9. Bake another 10mins. Store in airtight once cooled.

M&M cookies that makes me addicted


My lovely neighbor baked her own Raya's goodies this year and I am so happy cos I get to savour them. She made me M&M cookies, cornflakes cuppies, kokokrunch cuppies, some chocolate tarts etc. The one that my palate fell in love with was the M&M cookies.
Wanted to do them and give my lovely neighbor a surprise, I asked for the recipe and did it on a sudden impulse one afternoon. And she wrote, sugar powder. Smart aleck me, I took it as icing sugar. So there I go, went ahead with the recipe and I ended up with M&M melt-in the mouth cookies.
It was yummy too. And I gave her some to try. I still like her version as it is the crunchy cookies texture, her hubby commented he prefer this texture. And we were laughing and joking about th cookies. And what is sugar powder? She took caster sugar and blended them.
Haha, mystery solved!! I am going to try again with caster sugar, not blending them to see what chemical reaction gonna take place again.
M&M cookies (recipe from my lovely neighbor)
200g butter
150g caster sugar
1 egg
200g plain flour
150g cornflour
80g optima flour
Choc chips
Mini M&Ms
1. Cream butter, sugar, egg til fluffy
2. Add in flour and mix them well
3. You may add in chocolate chips or M&M at this point if you want to have them inside the cookies or 
3. You can roll the cookie dough in balls and flatten them, topped with the Choc chips and M&M
4. Bake for 20-30mins, 160deg or til cookies are browned
**if you want the melt-in-mouth texture, you can take out when it is browning
**if you want the crunchy feel, you can only take out when it is darker tone of brown

Soy Beancurd


 I am using Ellenaguan recipe to mimic the Laoban Beancurd taste.
First time using gelatine for the soy Beancurd and the end results yields a very pudding-ish Beancurd which feels like you are eating jelly Beancurd. My kids loves the texture.
Anyway, this Beancurd craze, thankfully I am sort of over the Q-ing part. Used to faithfully Q over the weekend to bring back at least 10 bowls of Lao Ban. So was it over-eating them that sort of makes mes not so into them anymore?
Anyway, this recipe is a quick fix though it is not 100% the same. Simple, fast and easy to make at home. Specillay dedicating this post to a friend I made in Made Food with Love in Facebook - Alan Goh. And thanks for the gentle reminder for the simple food that we grew up with.
Soy Beancurd Recipe (recipe form Ellenaguan)
500ml Vitasoy/Soy Bean Milk
2 Teaspoons of Gelatine Powder
15g of Creamer, optional

1. Heat up Vitasoy/Soy bean milk in a saucepan over low heat(do not let it boil).

2. Put gelatine powder in a small bowl, ladle about 50ml of the warm soy milk in it and stir till gelatine powder melt and well mixed.

3. Next pour the gelatine mixture into the remaining warm soy milk, stir stir in creamer if using and let it simmer for another 30 seconds(careful not to let it boil).

4. Off the heat. Let mixture cool off slightly before sieving it into prepared containers to cool completely.
Chill for 3-4 hours before serving..

Wednesday, August 22, 2012

Sweet Treat for the Sweet Tooth


Came across this from Wokking Mum and it was a much rave in March (this was tied up with another post and I took it out to stand-alone for easy reference in future). So i made the Mango Ice Cream, chanced upon Popsicle and made them.
Popsicle was yummy, the kids love it but then could have blend the strawberries even smoother. Perhaps the seeds from the strawberries makes it a bit 'seedy'. Mango Ice Cream was yummy to the max. Seriously with all this ice cream recipes lurking around, I wished I have a Ice Cream Maker at home!! Anytime, I can make my own flavour of ice cream based on my mood!!


SStrawberry Popsicle (Recipe from Wokking Mum)
1 mango, skinned and stoned **i replace with 300g strawberry, about 1 box from NTUC)
Sugar to taste
4 cups of water

Blend all the ingredients together.
Pour the mixture into mold and freeze.

Mango Ice Cream (Recipe from Wokking Mum)
2 ripe Mangoes
200ml Whipping Cream
5 tablespoon Icing Sugar or to taste
Stone and skin mangoes.

Puree 350g of the mangoes (about 1 1/2 mangoes) and dice the rest.
Mix or blend the mango puree with sugar and whipping cream.
Add some diced mangoes too if you like to the blended mixture (I did though you can't see it from the photo). It's really nice to be able to bite into bits of mango when you eat the ice cream.
Pour the mixture into a container.
Place a piece of baking paper on it and freeze till frozen.


Chewy Choc Chips Cookie


Motivated or rather 'pushed' to bake this cookies for my gal's Teacher's Day gifts for her 2 lovely teachers at play group. So why did I say 'PUSH'? Oh, I seldom make this sinful, sweet and fattening treats at home. Firstly, I can't resist and keep munching away, my gal will keep asking for it, hubby will also unknowingly munch on it. So unhealthy cos of the amount of sugar, butter used for making them.. But then again, once in a blue moon indulge lo. LOL!
I bought 2 glass bottles from Daiso, did a minor deco, did a trial run on this cookies before the actual bakes. Yummy and addictive were they. I think i ate them on the pretext of making sure they are fully cooled down before storing them. Hahah.
Took some picture of them in plastic packaging, and also in the bottles that I intend to give the teachers, trying to see if there is any pocket money to be earned since I will be baking more than enough for the teachers. After filling up the bottles, I realized that either I need to make it even smaller as bottle necks are narrow, or I need to find another bottle for them in less than a weeks time. (gal end school on 30Aug for term break)
Anyway, I came across this recipe when searching through the experts blogs, came across and was itchy enough to want to make them. 
Chewy Choc Chips Cookies (recipe adapted from Peng's Kitchen)
Ingredients
  • 2 eggs
  • 265g brown sugar (i reduced to 170g)
  • 125ml vege oil
  • 1tsp vanilla essence
  • 150g plain flour
  • 110g self raising flour
  • 1/2tsp bicarbonate soda
  • 1 cup walnuts chopped
  • 150g choc melts halved
  • 3/4 cup raisins

Methods
1. beat eggs and sugar for abt 1 minute.
2. stir in oil, essence and sifted dry ingredients until combined.
3. stir in walnuts n choc melts.
4. cover, refridge for an hour. (mixture will be soft)
5. roll rounded tablespoon of mixture into balls, pressed down slightly and placed on greased oven tray.
6. baked at preheated oven 180 degrees for 12 minutes or until lightly brown

The famous MrsNgSK Butter Cake


The much sought after butter cake that sort of promised no cracks and best taste, as per from my MFWL frens. I finally did it with Emborg Butter, grab 2 at NTUC was having promo, the taste is yummy, texture is soft and addictive. Oh my, I should have make tis earlier.
The only minus point was it was too sweet for those who didn't have a sweet tooth. I did it with 90g + 50g sugar for the first, and 70g + 50g sugar for the second round. Final verdict is 80g + 50g for the future bakes.
Did plain old-fashioned Butter Cake, Walnut Butter Cake and then Mixed Berries Yogurt Butter Cake. Hubby and me like the old-fashioned ones, my GF Jas like Walnuts and another GF Gillian who is not a cake lover, actually finished the mixed berries one. I am so flattered! A non-cake lover actually like the texture and taste of the cake. Seriously!! I think everyone who owns an oven should try it. As for sugar level, pls adjust accordingly as per comments above.

Mrs NgSK Butter Cake (recipe adapted from WendyInkk)
230gm butter (salted), softened (cool at 18-20C, not glossy)
200gm eggs, no shell (4 grade B eggs)
50gm + 150gm sugar
200gm self raising flour, sifted.
60ml milk
1 vanilla bean, seeds scraped (or 1 tsp vanilla extract)

1. Preheat oven at 180C (conventional). (I only use 170C). Prepare a 8 inch square pan. Line the base and grease the sides (greasing helps the cake’s sides to rise well)
2. Separate the eggs, and place the whites into a medium sized bowl (6 cup capacity)Beat egg whites until soft peaks, gradually add 50gm sugar and beat until stiff. Set aside.
3. Cream butter and 150gm sugar until pale and fluffy (KA speed 2-4 ). Put in vanilla seeds and and beat for a while. Put in egg yolks one by one and beat well after each addition.
4. Put in half the flour and mix on low speed until incorporated. Put in milk in 2 additions and mix until well incorporated. Mix in balance of flour.
5. Put half the egg whites in and mix on low speed. Pour the balance of egg whites in and FOLD.
6. Pour batter into pan and level.
7. Bake for 45 minutes or until skewer comes out clean. (I reduced to 150C for the last 15 minutes because the top seems to be getting dark)

*Note: I did step 2 and 3 simultaneously. Butter in the stand mixer and egg whites with the hand mixer.


Yamie - Nasi Bryani & Yellow Curry


Yes, time to be lazy when I happen to be not in the 'mood'... Sometimes just wanna a easy way out. I do have premix, ready-to-eat conveniently at home on days that I want to be simple. Fuss-free, I would say. 
This fateful dinner, was sort of intrigued by hubby who say this Bryani Rice packaging on our weekly grocery shopping. So grab a Bryani version and Claypot version since it is on a promo again. Yes, very much tempted by all cheap bargains at supermarkets. Haha, and Did I mention? I got a Myojo Lor Mee Bowl cos of the same word - Promo again!! 
Anyway, let the picture do the talking. I just follow instructions on the packaging, idiot-proof cooking time. Just follow the steps and you won't go wrong. I simply microwave the rice, replace low-fat milk for coconut milk. And there it is, a simple dinner for 2. 
Taste wise, curry is yummy. Rice is average. Try it.

Tuesday, August 14, 2012

A sumptuous western meal


A yummy meal that is wiped out in less than 15minutes by my 2 toddlers who usually take ages to finish their dinner. I added salad to their western meals for a touch of green. Usually a sunny-side, chicken or fish with salad.

Deep-fried Fish Fillet
2 pieces of Sutchi Fillet
Marinade
1Tbsp Light Soy Sauce
1Tbsp Sesame Oil
Dash of pepper
Dash of black pepper
Dash of cornflour

Cut the fish fillet to desired sizes
Marinate the fish at least 1-2hours earlier
Prepare bread crumbs
Cover bread totally with bread crumbs and deep fried til golden brown

Pan-fried Salmon
1 piece of salmon
Dash of pepper
Dash of black pepper
Dash of salt
Dash of garlic powder

Cut Salmon into pieces and marinate with seasonings 1-2hours before
Pan fried til cooked

Pan-fried Chix Thigh
2 piece chicken thigh
2Tbsp Oyster Sauce
1Tbsp Light Soy Sauce
1Tbsp Sesame Oil
Dash of pepper
Dash of Cornflour

Cut Chicken thigh into pieces and marinate 1-2 hours before
Pan fried til cooked

Salad
Lettuce
Boiled baby carrots
Tomatos
Crabsticks
Bacon bits

Wash and cut the greens
Toss with mayonaise and bacon bits

Another bread recipe to 'bookmark'


I tried another great bread recipe rav by my MFWL's kakis who have tried it and said that it is soft and yummy. All thanks to a great person on Facebook - Soh Pin Tee, willing to share all her great recipes with fellow bakers. And I would say, I really love the soft, kinda chewy texture instead of the soft, cottony texture bread. Got that 'jiao jing' bite to it. Loves..
I tried it once, following the original recipe, using plain bread flour solely. Hubby and I love it, and we finished a batch of bread in 2 days, for Breakfast, Supper and even as snacks thru the day.
And I tried it again, this time i modify and added Wholemeal flour, still soft, texture still chewy but a little not as soft as the 1st time. So maybe I should reduce a bit of wholemeal to 50g, instead of 100g this round? Made some mini hotdogs, plain bread rolls & garlic bread roll. I did some otah bread as well but didnt post it cos the pics doesnt justify the bread la.
I do not have her blog so I am gonna just type out and credit to her, in words. Maybe 1 day I will be able to find her blog. =)

Recipe
340g Bread Flour***
50g Sugar
1Tbsp Yeast
1/2tsp Salt
210g Milk
40g Butter

Method
Mix dry ingredients for 1 min
Add in Milk and knead into dough
Add in Butter last and knead til elastic and smooth. (Do the membrane test at this point)
Leave to proof for 1hour
Punch out air in dough, cut and divide and rest 15mins
Shape dough and fill with desired fillings, proof another 45mins
Brush with milk before baking
Bake at 180deg for 15-20mins or until bread surface is browned

***I added 100g Wholemeal + 240g Bread flour for the 2nd round. Will reduce a bit next round to work on the softness***

The advanced mooncake trial


Much to my anxious and also 'kan-cheong', i was already trying to find out which recipe can make the softest snowskin mooncake's skin. I have tried a couple and not satisfied with it (which I do not want to name which are as different bakers may yield different results so it wont be fair to criticise or say any recipe not good). So i happen to chanced upon this 2 recipe that I really like. And i will share with all the viewers who are keen to try out at home.
I tried a recipe from Anncoojournal, using those snowskin premix. It was easy to handle and it is really soft and chewy texture. I used that for Lotus & Green Tea paste. Another was from Auntyochanna, using Ice Cream Soda with Kou Fen and it was really nice. I used it for Durian paste and added durian essence to the skin. It smelled like durian ice cream, those traditional type. Yummy and soft with a sweet durian smell.
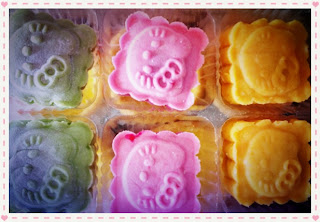
I have made them into Kitty, traditional design and then spent 6-7hrs 1 afternoon, rushing out some trial samples orders for my friends and my mum's collit. A total of about 150pcs mini snowskin mooncake already took me 1/2 day.. tired tired. But end result was great when you see all the colourful mini mooncakes in front of you.
Snowskin Mooncake (Recipe from Anncoojournal)
45g Ordinary Kao Fen
225g Snowskin flour (KWT Pinpe Premix Powder)

60g Icing sugar
45g Shortening
350g Water
1/2 tsp Green tea powder
Boil 350g water and green tea powder together and cover with lid, simmer at lower heat for 5 minutes, leave to cool. Stir well and measure green tea water to 300g.

Combine kao fen and snowskin flour (KWT Pinpe Premix Powder) in a large bowl and set aside.
In a pot, mix 300g green tea water with icing sugar and shortening together and bring them to boil until shortening melted, stir with a hand whisk.
Pour the hot liquid mixture to the flour and use spatula to stir mixture to soft dough and leave dough to cool (you'll find the dough is quite oily at this time) then knead dough again to smooth.
Measure dough to 22g and wrap in 25g green tea lotus paste.
Roll it into a ball and dust with some cooked glutinous rice flour (Gao fen 糕粉).
Press firmly into mould ~~unmould it and store in airtight container.
Chill green tea snowskin mooncake before consume.


Snowksin Mooncake using Ice Cream Soda (Recipe from Aunty Yochana)
90 gm. fried glutinous rice flour (Kao fen)
10 gm. tang mien flour
30 gm. shortening
40 gm. icing sugar
200 gm. ice-cream soda or 7-up
little pandan, pink, lemon yellow colouring

Sift the glutinous rice flour and wheat starch into a mould.
Add in icing sugar and shortening and mix till thoroughly mixed.
Pour in ice-cream soda and mix into a soft pliable dough.
Divide dough into 4 portions. Add colouring to each portion, leaving one portion white.
Place each dough between plastic sheets and roll into a rectangular flat piece of the same size. Stack the dough on top of one another, then roll into a swiss roll.
Cut into 6 equal pieces. Divide the lotus paste fillings into 6 portions.
Roll the spiral part into a flat piece and wrap with lotus paste filling. Press into a mooncake mould then knock out.
Chill before serving.

Please try both recipe as it is really good. 1 is soft and chewy to texture, another is soft soft and feels like ice-cream snowskin.