Sunday, October 21, 2018

Chilli Crab sauce w/Mantou


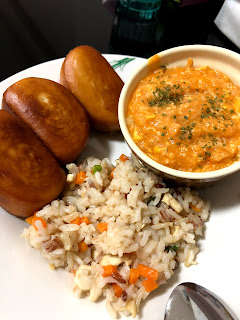
Tonight we have Chilli Crab Sauce served with Mantous and Fried Rice. Kids had some over wedding reception and crave for the sauce. Mantou has always been their favourite treats whenever we went crab feasting.. Those mini deep fried ones! Yummy!! 

I managed to get the bigger ones so I cut into halves and fried them. Overly crispy as I couldnt control the temp of oil well. It darkens so fast! Lol! 

The sauce mainly made up of chilli sauce, tomato sauce, sugar and water. I added some golden mushroom for that texture, frozen crab meat (already taken out of the shell) from NTUC. Makes my life so much easier. You can substitute or do without if only using as a dipping sauce. I will also do as a dipping sauce in future also as the kids prefer to dip and dont really eat much of the crab. 

Sharing with you my humble simple chilli crab alike recipe today! ❤️❤️

Chilli Crab Sauce (can omit and use as dipping sauce)
500-800ml water, adjust accordingly
2 eggs, beaten 
1 packet frozen crab meat
1 packet golden mushroom, cut halves
4Tbsp Tomato Sauce
4Tbsp Chilli Sauce
1Tbsp Sugar
Cornstarch, to thicken

*add more chilli or tomato sauce and adjust to your liking

1) Stir fry garlic. Add in crab meat n golden mushroom. Stir well to cook them
2) Add 500ml water first n bring to boil. Add in the sauces & sugar. 
Add more water bit by bit and taste it. Adjust accordingly
3) Add beaten eggs and stir. Add in cornstarch and stir to mix and thicken. Serve with mantous or over rice. 

Tuesday, October 16, 2018

Orange Jelly Marbled Cheesecake


Today decided to play Cheesecake. I bought some ready graham crust from Cold storage and made some Oreo crust at home! 😋


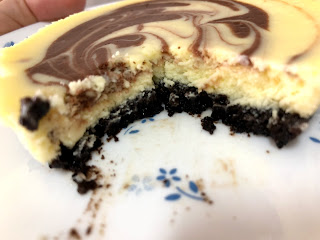
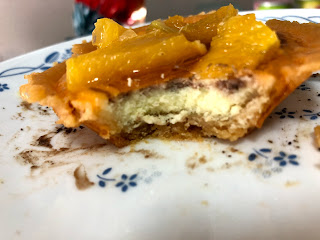
Spur or moment, decided to make 1/2 of the cheesecakes with a Orange Jelly Layer on top. But little did I know that I need to chill the cheesecake first before adding the jelly top layer so that the cheesecake is more stable. So my Jelly cheesecake wasnt that pretty! You can see the layer of jelly not even and it sort of seep in thru the sides of the crust! But despite that, its very nice! The orange jelly + orange bits is good combi with the marbled cheesecake! Hubby took 1 and couldnt resist and went for another from the fridge!


I am using back an old recipe from here with my own modifications to the creamcheese batter!  So today I will rewrite the recipe here so that I can easily refer back here! Fast n straightforward recipe! Try it!!

Orange Jelly Marbled Cheesecake (slight modications from EllenaGuan)
Crust: 
Oreo x 12pkts of 3 oreo + enough melted butter 

1) Put them in baking liner and chill overnight

Jelly: 
1pkt jelly powder
1/2 orange, cubes

Cheesecake: 
250g Cheesecake
150ml whipping cream
100g Sugar
3 Tbsp Cornflour
1tsp Vanilla Paste
3Tbsp Lemon Juice
3 Eggs
3Tbsp Coco Powdee

1) Whip creamcheese, whipping cream, sugar, vanilla paste, lemon juice, cornflour together til well mixed.
2) Add eggs 1 by 1 til mix well. Dont overbeat it.
3) I take out 10-15Tbsp of batter and mix til coco powder is well mixed and set aside. Fill creamcheese mixture to crust til 75% filled. Drop coco mixture and swirl them.
4) Bake at 180deg for 40-45mins. Cool down before fridging them
5) Prepare jelly mixture after cheesecake set in fridge. Preferably 4hrs or overnight. Arrange orange slices and use spoon to scoop jelly mixture. Chill 4hrs before serving!


Friday, October 12, 2018

Spicy Rice Cakes


I used to always buy those ready made rice cake sauce and keep them in my fridge. Always crave for them wheneever I am watching korean dramas.. After watching so many dramas and some korean cooking videos shared by friends or social media! I realised that Hot Pepper Paste can cook so many types of korean dishes, depending on how u mix them up! ❤️❤️

I use it to cook my ramen so i only buy those plain ramen from Korean mart at $0.70. Way cheaper than buying a pack of ramen. Kimchi fried rice, korean stews, rice cakes and so many! So today I am sharing my own Spicy rice cakes that I always cook when I crave for them!

I went to the Korean mart and got the fish cakes. Quite yummy. Its more to the sweet side which complement the spicy sauce. Above is a pic I found on google. Mine is plain, non vegetables version! $2.20 and comes with 5 sheets of the fish cake.


I am using the pepper paste and kimchi as above. Easily available from NTUC, korean marts or most of the supermarkets! My rice cakes are also from NTUC. All so easily available to buy! Pictures are from google!

Here’s my yummy lunch! And all it took is 15-20mins..


Spicy Rice Cakes
1/2 pkt rice cakes
2 sheets of fish cake, cut into rectangulars
1scoop Hot Pepper Paste
1scoop kimchi
500ml water, can add more if it dries up
1/2Tbsp anchovy powder

1) Bring water to boil in pot. Add anchovy powder.
2) Add hot pepper paste and stir dissolve them
3) Add rice cakes and fish cakes and let it simmer for 5-10mins
4) Add kimchi and mix well. Sprinkle some korean chilli flakes if u like it more spicy. Serve warm!


Monday, October 8, 2018

Peach gum dessert


Lately a friend has been posting her Peach Gum dessert on facebook, got me so tempted to try. And because it has benefits to promote healthy skin and many others. I just had to try it and make some for my family. 

I tried to google a few recipe to see which i like. Apprently, there is no specific ingredients that must go into this pot of goodness. So i decided to jus have some of my favourite ingredients like lotus seed, and gingko nuts (nah not my fav but its very nutritious for the kids)..  Now so much fortunate as NTUC sells pre-boiled and cleaned gingko nuts and lotus seeds! I still remember it takes hours to boil, soak, clean both of them when my auntie was preparing to make a pot of Cheng Thng! 

I was curious how to clean the peach gum so i google for a youtube video. Seems quite simple as after soaking it soften and jus need to snip off the black impurities and cut into smaller pieces. Hope the video helps for those trying the dish for the very first time! 

Just dump all ingredients A into pot, and bring to boil.. (Sorry my pic didnt show the pandan leaves 😬😬)
Then add remaining ingredients B and boil another 10mins. Done!! 

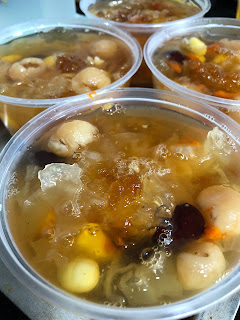
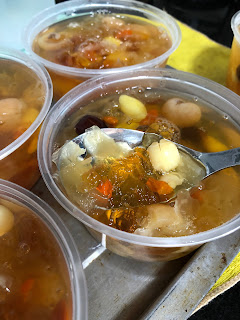
Here we go for a bowl of delicious and ‘skin beautifying’ dessert! ❤️ I put mine in the disposable for chilling and enjoy! 😊😋


Peach Gum Dessert Soup (approx 6 portion) 
A) 
1 bundle pandan leaves (about 5-6 leaves)
Handful red dates
Handful dried longans
3 ‘balls’ white fungus, soaked and cut into smaller pieces
Handful of peach gum, soak and cleaned
B)
1 pkt lotus seeds 
1 pkt gingko nuts
Handful wolveberries
Rock sugar to taste

1) Wash and put all ingredients in A into pot and fill 1/2 pot water. Approx enough to cover ingredients.
2) Bring to boil then simmer for 30mins til peach gum softens
3) Add in ingredients in B and bring to boil. Then taste and add more rock sugar accordingly.
You may add a bit more water at this point if you feel that the water is not enough.
4) Simmer for another 10mins. Can be served warm or chilled.

Wednesday, October 3, 2018

Pig Trotter Bee Hoon


Hubby requested for Pig Trotter Bee Hoon after like so long! I cant even remember when was the last time I fry this bee hoon! LOL! So since he craving and its really effortless to whip up this dish so cook for him lor! 

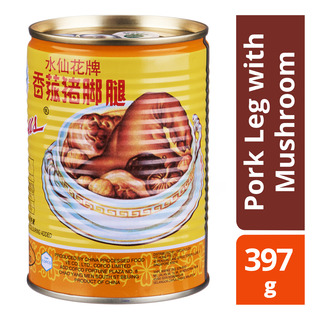
I got this image from NTUC for the pig trotter I am using. Usually i like to mix 1 can of this with 1 can of the stew pork for more flavour! Today I forgot to grab 1 so just had to make do with it! Wanted to grab beansprout and xiaobaicai to add but beansprout wasnt that ‘pretty’ so plan abandon. Simple xiaobaicai, 1 can of pig trotter and egg shreds, not forgetting my sambal! Slurrpp!! Yummy!!!

Pig Trotter BeeHoon (Approx 3 adults and 2 Children)
2/3 packet of bee hoon, soaked til soft
1 can Pig Trotter
1 pkt xiaobaicai
2 eggs, beaten and fry to omelette and cut to shreds

1) Sautee garlic to fragrant. Add veg and pig trotter in to fry well
2) Add 1 can of water (using the pig trotter can) and bring to boil
3) Add soaked bee hooon. Drizzle moderate amount of dark soy sauce depending on the dark hue you want for the bee hoon. Dash of pepper and mix well
4) Using a chopsticks, loosen the beehoon to make sure they are not stick into a lump. Continue loosening and adding water when it dries up
5) Add more water moderately til bee hoon is soft and springy. Drizzle a few drops of fish sauce for taste
6) Decorate with egg shreds and serve warm! Dun forget your sambal!

Friday, September 28, 2018

Cheat meal - Cheesy Baked Rice


Decided to cook a simple meal with cheat ingredients. Jus assemble them and you look like you just whipped up a professional restaurant style dish! 😂😂 Was out the morning and lazy to guide the helper in cooking dishes so just instruct her to baked popcorn chicken and cook rice for me! 


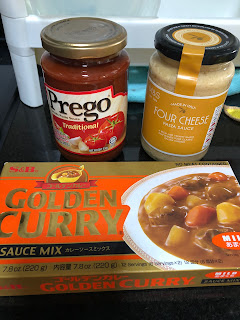
I used Prego Tomato Pasta sauce and Marks & Spencer 4 Cheese sauce to make a creamy tomato base for the kids! Didnt know if the kids would love the japanese curry with baked cheese so made 2 types of rice tonight! You can also use your own preferred sauce for the rice too! It all depends on your tastebud! 


I scoop the plain rice in the baking dish. Then topped with scrambled eggs, popcorn chicken. I covered the top part with the sauce before layering them with a thick layer of mozerella! I love to get the white+orange mix as the baked cheese will look especially orangey when its turn! I love that shade!! 


A glimpse of the baked dish! 😋😋😋

Tomato cream sauce
1Tbsp Prego Tomato Sauce
1/2 Jar M&S 4Cheese Sauce
125ml Milk

1) Mix all together and bring to boil. Feel free to add your favourite vegetables! I added brocolli!

Japanese Curry sauce
1/2 slab of S&B Mild Curry Cube
Water, accordingly til taste is not overly saltish

1) Mix them up and stir continuously til the cube is melted. Taste and make sure it is not overly saltish before adding to rice! 

Baking them:
1) Covered with cheese and bake at 170deg, top heat til it looks browned and crispy!


Thursday, September 27, 2018

Butternut Squash Chicken


Saw many version of people doing ‘poke-bowls’ so i decided to make 1 pokebowl for my kids! Something nutritious and simple yet the kids will love it! Stir fry butternut squash and chicken! Remember to buy butternut squash instead of the pumpkin, there’s a difference to the texture and taste in the end result! The butternut acutally gives a creamier texture to the gravy after jt is cook and softens, which the pumpkin doesnt. And the kids loves that ‘squashy’ texture! Find out more among the different pumpkin here.

I make some scrambled eggs to go along with the rice, sprinkle some seaweed shreds and japanese rice flakes to create that visual appeal! 🙊🙊 Kids love it and finish it so fast! Even the youngest ate so fast too! A super fast and easy to prepare meal for everyone in the family!


Butternut Squash chicken
1 thigh meat, boneless, slices
1/4 butternut squash, cubes
1Tbsp dried shrimps
3Tbsp Oyster Sauce
2cups water, add accordingly

1) Sautee garlic til fragrant and add dried shrimps
2) Add in pumpkin and stir fry them. Add in chicken slices and mix them up
3) Add oyster sauce and water til cover the ingredients
4) Bring to boil and simmer til pumpkin soften
5) Serve warm with rice

Char Kway Teow


Cooked this multiple times but didnt had the time to sit down and record down. Particularly for my girl who ‘maybe’ want to learn mummy’s cooking and also to share with everyone how to whip up a simple 1-dish meal at home where you can add loads of vegetables to the sinful Char Kway Teow! 

Actually, very simple dish and all you need is sweet sauce, dark soy sauce and light soy sauce! I prefer it to be more on the sweet side so i added more sweet sauce! For those who prefer the white version, dun use the above sauces. Just fish sauce will do the trick with some white pepper!! 😋😋


Char Kway Teow
1/2 pk KangKang Kway Teow
1/2 pk KangKang Yellow Mee
2-3 Tbsp Dark Soy sauce
1-2 Tbsp Light Soy Sauce
3-5 Tbsp Sweet sauce

Beansprout
Baby caixin
Fishcakes
2 Eggs

1) Blanch yellow mee and kway teow with hot water and drain.
2) Wash and cut caixin, soak beansprout for that extra crunch. Slice fishcake into thin slices.
3) Heat oil, crack 2 eggs and stir them up. Once egg cook, add 1tsp oil and put in garlic.
4) Sautee garlic til fragrant, add fishcake & vegetables and mix well.
5) Add yellow mee and kway teow when veg are 80% cooked.
6) Slowly add in the sauces and mix them up. Taste them before adding more to your preference. Serve warm!

Tuesday, September 25, 2018

Effortless & Easy Roast Pork


Wanted to teach as much simple dishes that helper can recreate when I need her to be in charge of cooking meals! Teaching as much simple ‘oven-baked’ dishes and yet fulfilling enough as a dish for the family! 

Today I made roast pork, baked to my expectations of crispy skin! Slurrpp, so super crispy today! Had to turn the meat around as my oven is not even in heating and monitor the ‘cackling’ as well! Definitely worth all the monitoring and work! ❤️❤️


Super fuss free, jus blanch, score some lines at bottom and rub with 5-spice powder at meat area. Drizzle sesame oil + some salt on skin. I let it sit for a while in room temperature and before i started baking. I google a few recipe and make it to my own preference! Sit it on a bed of garlic to add some aroma.  

After the first 15-20mins of baking, i set to top heat and bake n monitor the cackling. ❤️❤️❤️ 

Simple Roast Pork
1 slab pork belly
Some 5-spice powder
Some salt
1 Tablespoon sesame oil
2/3 clove garlic

1) Blanch pork belly. Then score a few lines on the bottom. Use knife to scrap the skin and get rid of hair. Poke with skewers to make as much holes as possible.
2) Rub some 5-spice powder til whole bottom area and sides are covered.
3) Turn to top, skin up and drizzle 1 Tbsp of sesame oil and dash of salt. Rub and make sure all covered. 
4) Wash some garlic n place on foil. Sit pork belly on top.
5) Bake at 190deg for 15-20mins time. Turn to top heat and bake 170deg til skin is crispy. I shift my pork belly every 15mins as my oven is not even in heating.
6) Pork is done when skin is all crispy. Cut into serving serve and serve! 


Monday, September 24, 2018

Lotus Root Chicken Soup II


Improvised my old recipe to tis current one which dont require to add any form of seasoning! Super rich, flavourful and sweet! Kids love them! Definitely a keeper! 


I use ikan billis soup stock as base. Drain the soup before adding chicken drumsticks, chicken feet and all ingredients to double boil them! ❤️❤️ Love this way of boiling soup as it’s all natural goodness and I feel safe giving loads to my 2yo and the big kids too! 

I love adding chicken feet then eating with my bowl of rice plus sambal! Shiokness to max, like my comfort food on a gloomy and tiring day. So here I am sharing my favourite way of cooking soup with all of you! Feel free to add fishballs and whatever ingredients you like to make it into a 1-pot soup meal! 


Lotus Root Chicken Soup II
Ikan billis Soup Stock:
1 bowl of ikan billis, rinse
1 clove garlic
1 piece of garlic
2 small shallots

5-6 Chicken Feets
2 Drumsticks
3-4 pieces pork ribs
1/2 hand length lotus roots
1 carrot
1 corn
1 handful red dates
1/2 handful wolveberries

1) Wash and peel of skin of shallots, ginger and put aside. Break the clove of garlic and wash them, put aside. 
2) Put a pot of water, approximately 3 bowls of water (same bowl as you measure your ikan billis) 
3) Add shallot, ginger and garlic to pot and bring to boil. Once boil, lower fire and simmer for at least 30-45mins.
4) Drain soup and keep for using.
5) Blanch all the meat and add to pot of stock. Add in all remaining ingrdients except wolveberries, bring to boil, simmer and boil tip chicken feet, drumsticks and pork rib is soft. Serve warm!