Wednesday, April 28, 2021

Creamy Macaroni (Pressure cook)


My secondborn loves mac and cheese but i feel that mac and cheese is always nicer when eating straight out of the oven after baking, therefore decided to use campbell soup and make a creamy macaroni for recess. Added in some greens and proteins! 


Use simple ingredients that I have at home. Easy peasy prepare them the night before and only need to throw them in the pot. All it takes is 10mins and you get a pot of creamy macaroni ready for school! 🥷


Ready for school ❤️


This is how easy it is! Jus throw, close and stir! 😍

Creamy Macaroni (Pressure cook)
1cup macaroni
1can Campbell Soup (I use cream of chicken)
1.5can Milk (using the can for the soup)
100g beef shabu, cut smaller
Brocolli
Carrot
Frozen corn kernels

1) Put ingredients into pot and spread them out. Then pour in milk and canned soup. Stir them up and break up the beef slices too. 
2) Pressure cook on Hi x 2mins and natural release 5mins. After that quick release if there is still pressure
(Macaroni suggested cooking time is 8-10, so I use 8mins/2 then minus 2)
3) Stir well to combine the macaroni. Ready to eat! 

Tuesday, April 27, 2021

Century Egg & Shrimp ball Porridge (Slow cook)


Wanted to pop out for a while so decided to slow cook porridge for lunch. Adding century egg and shrimp balls for today’s porridge. 


Added some seaweed for the kids and youtiao for the adults. Simple and yummy lunch for all! 


Century Egg & Shrimp ball Porridge
1cup
8 cups water (I add 300ml of homemade chicken broth then top up balance with water)
150g Shrimp paste
2 Century eggs
15 dried scallops, soak overnight and add to porridge
Sesame oil
Pepper

1) Saute mode Hi. Add rice and water to pot and bring to a boil. 
2) Add in chopped ccentury eggs & shrimp paste (squeeze into little balls.
3) Slow cook mode x4hrs
4) Saute mode Hi, add chicken powder to taste if needed. Drizzle some sesame oil and pepper before serving ❤️


Easy Bread Pudding


Made easy bread pudding to use up the bread skin. After soaking in a milk bath overnight, the bread are soft and fluffy after baking! 😘 This is my first time trying bread pudding as well! 


I used chocolate chips and cinnamon instead of raisins as I dont like raisins. I love how the chocolate chips complement the cinnamon flavour! Only regrets is should have added more, and probably try dark chocolate chunks. And perhaps add in another 20-30ml of milk 😉


Can you see how fluffy it is? And it is soaked up with the milk and egg mixture overnight 😍 Try it. 


Easy Bread Pudding
1 Slice bread, cut into smaller squares
1 Egg
100ml milk 1tsp cinnamon powder
1Tbsp sugar (i omit but you can add if you want to be sweeter)
Chocolate chips
More sugar and cinnamon powder for sprinkling

1) Prepare 6 cupcake cases. Lay bread to fill 1 layer of base, put some raisins then put in 1 more layer of bread and top with a bit of choc chips and raisins.
2) Mix milk, eggs, cinnamon powder and sugar til well combined. Pour them over the bread and press down to ensure they are all soaked with milk mixture. 
(Prepare overnight if you are making for breakfast, if not a minimum of 3-4hours to enusre the bread soaked up the mixture)
3) Sprinkle a bit more sugar and cinnamon powder on top. Bake 160deg x 10mins. 

Monday, April 26, 2021

Foodi Hack: 2 Dish + 1 Rice


Sinple comfort meal on a Monday and it is hub’s Birthday today. Wanted to order in but hub says just chin chye eat so I jus cook a simple meal as I am still mugging for the upcoming tests with secondborn. 


Did a Black beans steamed fish. Had to chop up the fish head as it is too big for my tray. Light & flavourful gravy with the sweetness of the fish! Yums 😋


Did a trial vegetables dish! Hurray! It can survive the pressure cooking and didnt wither! Still crunchy and goes well with the gravy and seafood ❤️ 


I aircrisp some frozen sides after the mains are done! Easy homecooked meal is done!


Steamed Fish Head, Steamed Kailan w/seafood
1 Fish head
Ginger slices
1tsp dried black beans
1Tbsp sesame oil
1Tbsp huatiao
1Tbsp light soy sauce
2packs baby kailan
Shrimps
Scallops
1Tbsp sesame oil
1Tbsp oyster sauce
Pepper

1) Wash and pat dry fish head. Rub with salt n leave it for 1hour. Rinse and pat dry before steam. 
2) Place in tray and arrange ginger slices then drizzle seasonings over fish head
3) Wash and rinse kailan then arrange nicely on deeper tray. Arrange seafood on top, no overlapping. Mix above seasoning with 1/4 cup water and drizzle over vegetables.
4) Fish head on the bottom, followed by vegetables then rice. Pressure cook on Hi x 8mins and natural release 15mins minimally or keep warm til time to serve. 

Sunday, April 25, 2021

Salmon Wraps (TikTok wrap)


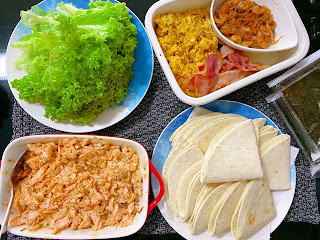
Using the viral tik tok style to wrap, i find it easier to eat and kids can self service n wrap up easier. 


I added scrambled eggs, bacon and some leftover beef patty too! Washed some lettuce and added some seaweed too. Kids totally enjoyed, whacking 2-3 wraps each 😅😅


So colorful n cute! Simple n easy lunch

Salmon filling
500g Salmon steak
2Tbsp tonkatsu sauce
2Tbsp mentaiko mayo
1tsp lemon juice
Black pepper

1) Sear the salmon til cooked then smash it into smaller pieces.
2) Add in seasonings and mix them well. 
3) Serve with wraps, along with eggs, lettuce, bacon ❤️❤️

Saturday, April 24, 2021

Cookie Base New York Cheesecake


Decided to bake a Cheesecake using cookie base for a change. Wondering if it will be nicer with that added crunch, and will the cookie actually still be crunchy as the base? 🤔


Since it’s hub birthday and he loves New York Cheesecake plus this cookie also his favourite so far, decided to have a go and try it out! Happy Birthday to the man of my life! Love you always and thank you for loving me so much ❤️


I used 8inch tin instead of 6inch thus the cake is lower but I love the proportion of the cheesecake and the cookie dough as its not overly cheesy. The cookie dough is very fragrant with the cinnamon flavour and surprisingly not overly sweet and goes so well with the creamcheese! Its not crunchy and its slightly soft with the cinnamon cookie taste. Hub loves it as compared to the usual digestive biscuits crumb base. Yay! 


A very easy and fast recipe to make and took me around 20mins to assemble everything up to baking the cake! Chill it overnight so remember to bake ahead ❤️

Cookie Base New York Cheesecake
Cookie base: recipe from here
125g Butter
125g Brown sugar (I used 100g)
178g Plain flour
10g Bread flour
1egg
1tsp vanilla extract
1tsp cinnamon powder
1tsp baking powder
1tsp bicarbonate of soda

Cheesecake: recipe from here
200g creamcheese
10g butter
10g sugar
15g milk
15g cornflour
1tsp vanilla extract
1tsp lemon juice
1yolk
1 white
30g sugar

1) Prepare cookie base by mixing everything together until it forms a dough. Chill.
2) Prepare cheesecake batter by mixing all ingredients together except egg whites & 30g sugar. Mix it til smooth and set aside
3) Using a mixer, beat egg whites and 30g sugar til it forms a shiny firm meringue.
4) Fold in meringue to creamcheese mixture in 2-3 additions. Do not overmix.
5) Prepare cake tin and press cookie dough onto base of tin. Try to spread it as even as possible.
6) Pour in cheesecake batter and knock a few time to even out the batter.
7) Pour water into base of pot. Put in steam rack and place cake tin on top. (I use foil to cover the base of cake tin in case of leakage or water seep in)
8) Bake 150deg x 20mins. Check after 15mins and lower temp to 120deg x 5mins (Ignore video as cake was set after 5mins)
9) Cool thoroughly before chilling it in fridge for 3-4hours or preferably overnight before serving ❤️

Friday, April 23, 2021

Foodi Hack: 2 Dish + Rice


Decided to play with my Tingkat again today before I take a small break on saturday as having an advance birthday dinner for my hub with my mum. Mum says gonna buy us crab so I shall take a small break then.


Tonite trying simple Thai steamed fish without the chilli so that kids can try some too. 


Then steaming some tofu and seafood along. Love love love this simple tofu dish! Please do give it a try.. Its doink~ doink~ tofu with crunchy shrimp paste! And a simple blanch xiaobaicai in oyster sauce and we are ready for dinner. 


All it takes is 10mins of prep work and blanching the vegetables. The rest all done by 🥷

 
Foodi Hack: 2 Dish + Rice
1 Seabass, butterfly
1Tbsp sesame oil
1tsp Thai fish sauce
1tsp huatiao
1 lime, juiced
1 lemongrass, cut into 4s
some ginger slices
1 tomato, cut into 6-8s
2tube Egg tofu
6-8 Fresh scallops
150g Shrimp paste
some wolveberries
1Tbsp sesame oil
1Tbsp oyster sauce
1Tbsp dark soy sauce
Pepper
1/4 bowl water

Blanched Xiao Bai Cai
Sauce: 1/2 bowl hot water + 1Tbsp sesame oil, 1Tbsp Oyster sauce and pepper.

1) Clean seabass and pat dry. Rub salt and leave it for 30mins
2) Put sesame oil on 1 tray and arrange egg tofu on it. Squeeze a ball of shrimp paste on top of egg tofu and put 1 wolveberries on top. 
3) Put some fresh scallops in between the tofu, also adding the shrimp paste and wolveberries too. Finish off by drizzling the sauce over
4) Prepare ingredients for fish. Rinse off salt and pat dry then place fish on 1 of the tray. Arrange tomatoes, lemongrass around fish. Drizzle sauce for fish over then sprinkle ginger on top.
5) Meanwhile bring 3cups of water to boil and blanch xiaobaicai. Remove and set aside. Now add in tingkat (Fish, Tofu then Rice on top) and Pressure cook x 8mins and natural release for 20mins.
6) Drizzle sauce over xiaobaicai when the Tingkat dishes are ready. Serve warm ❤️

Thursday, April 22, 2021

Easy Fish Stew


Wanted a simple dinner with minimal prep so made this simple fish stew in tomato base. Great use for the homecooked chicken stock the other day! 


A simple meal with all the nutrients needed. Great for a rainy afternoon ❤️ 


Simple step by step for all. Best part was I steamed my rice on top while I simmer the stew 😍


Easy Fish Stew
1kg Sutchi Fish, small thick slices
150g Cherry tomatoes
1can Diced tomatoes (411g) 
300ml Homemade chicken stock
1 onions, diced
1 whole garlic
1-2 bay leaves
5 celery, small pieces
1 carrot, thick slices
150g Peas
3 Eringyi mushroom
Salt and pepper to taste

1) Cut and prepare fish slices, marinate with pinch of salt and pepper. Set aside
2) Sautemode Hi, Heat up olive oil in pot, and saute onions and garlic.
3) Slowly add in all vegetables except peas and pour in diced tomatoes and chicken stock.
4) Put steam rack on top and place rice on top (Optional, if you are steaming rice)
5) Steaming mode x 15mins
6) Remove rice and rack. Add in fish and peas then bring to a low simmer. Once fish is cooked, add salt and pepper to taste. Serve warm with rice. 

Wednesday, April 21, 2021

Foodi Hack: 2 Dish + 1 Rice


Been thinking how to better use the tingkat so that I can spend less time on preparing dinner this week as mummy got to supervise some light revision this week. 


Decided to steam yongtaufoo since I am going to the market and slotting the brocolli in between them so that I can take care of 2 dish in 1! 😂😂 So yums!! Brocolli still crunchy n not mushy, goes so well with the sauce. 


Another dish to try is the kids’ favourite Bulgogi beef. Today try steaming them and hopefully it will turn out well. With the usual marinade I used, steaming will have more sauce created and keeping fingers crossed it wont make the dish any less flavourful. 🤞🏻🤞🏻 Thankfully it is flavourful with more gravy for the rice! 😍 (Only setback, dun overfill too full to brim as top tt was ‘pressed’ by the tray on top was slightly uncooned. I steam it another 2mins)


And since grandma doesnt eat beef, I grill a promfret before doing my pressure cook so that time is not wasted and still minimal cleaning with just 1 pot! 👏🏻 Promfret is nicely grilled as usual! Rubbing with some tumeric and salt is already so flavourful. 😋😋


Simple video of the dishes before and after. Hope you enjoy my dinner tonite! 

Foodi Hack: 2 Dish + 1 Rice + Grill Fish 
300g Beef Shabu, cut into halves
1/2 onions, thin slices
2Tbsp Bulgogi sauce
1Tbsp mirin

Yong Tau Foo (I buy enuf for 3 pax)
Brocolli
2tsp dried black beans
1Tbsp Dark soy sauce
1Tbsp Oyster sauce
1Tbsp Sesame oil
Pepper
1/2cup water

1 Golden Promfret
1tsp tumeric powder
Pinch of salt

1) Wash and gut promfret. Pat dry and rub salt and tumeric over fish and set aside to marinate for at least 1 hour.
2) Marinate beef shabu with bulgogi sauce, mirin and set aside. Perferably for 1hour.
3) Wash and cut brocolli, rinse yongtaufoo and arrange on tray. Slot brocolli in between the yong tau foo. Prepare the sauce and drizzle evenly over the yong tau foo.
4) Grill Promfret x 10mins, flip and grill another 10mins. Remove and rinse pot. 
5) Put beef on bottom, followed by yong tau foo and rice on top. Add 3 cups of water, put tingkat in and Pressure cook Hi x 8mins and natural release 15mins. (I kept warm til its time for dinner, approx 25mins)

Priscilla’s Bolognese Beef Fusilli


Today we have ‘baked’ Priscilla’s Bolognese Beef Fusilli to school! Everything dump in a baking dish and let it bake! 🙈🙈🙈 Oh man, love this method and just need to think of ways how to use this around my daily meals 😍 Pasta is always a win-win with the big kids as the youngest still prefer Fried rice a lot. Or anything rice. 😅 

I call it Priscilla’s cos I added milk to the tomato pasta sauce as the kids dont like it too tangy and the milk will sweeten the sauce slightly. Stirring in a bit of parmesan at the ending will add some flavours to the pasta too! The beef bites will get the kids happy as they love beef! 


Easy fuss free method, only washing 1 dish after the cooking. Loving this! Gonna try more creation with this style of pasta cooking ❤️


Kids’ meal to school for today! Ease my work so much. 


Priscilla’s Bolognese Beef Fusilli
1/2cup fusilli
1/2cup pasta sauce
1mini beef patty, tear into pieces
milk, pour enough to submerge the fusilli
grated parmesan


1) Prepare baking dish and pour fusilli in it. (Dont overfill and yes I overfill slightly. Jus enough to fill the base of dish with minimim overlap)
2) Tear beef patty on fusilli. Pour in pasta sauce then follow by milk enough to cover the fusilli and give it a gentle stir to make sure all is covered in milk
3) Bake 180deg x 23mins (I extended another 8mins after the first 15mins as it is not fully cooked yet)
4) Give it a stir and top with more milk and add in grated parmesan cheese. Mix it well and add more milk if needed. Sprinkle some parmesan on top and bake another 5mins.
Serve warm and sprinkle some parsley flakes and chilli powder if you like ❤️

Tuesday, April 20, 2021

Foodi Hack: Chicken Rice + 2 dish


Thinking of making more us for my tingkat trays so instead of cooking chicken rice in the pot, I decided to make use of the tray so I can make more dishes out of it! 

Decided on making some assam stingray for myself and add on a longbean dish for everyone! ❤️ The recipes are all very simpl homecooked dishes and since only using ‘steaming with the pressurecook mode’ everything is simplified. 


First time trying vegetables dish on pressure cook mode. Thinking that longbeans need to be softer therefore first trial was to try adding it as 1 of the dish for the tingkat method! Surprisingly they are soft and crunchy inside!! Its cooked well! And managed to soaked in the sauce I put in earlier to steam it with! 👏🏻


The stingray and shrimps is nicely steam and gravy compliment rice so well! Too bad I am on low/no carbs diet, I tried to control myself from having rice 😉


The only flaw was the rice and chicken as the chicken leg covered the rice too much thus the rice wasnt cooked that well in the middle. Probably would be better if I had used boneless chicken leg. 2 would be nicely on top of the rice giving it enough place to steam and also cook the rice. I ended up steaming the chicken another 5 mins and then steaming the rice another 10mins. Phew 😅


The sauces to make are also simple and straightforward to enhance the flavours of the dishes. Do give it a try and let me
know. 


Chicken Rice + 2 Dish
3 Chicken legs
1 garlic
1 pc thick ginger
pandan leaves (i left out as i forget to buy)
1 Stingray, approx 200g
Some shrimps
1 tomato, thin wedges
Ginger slices
4Tbsp Assam sauce, Ikan brand
1pack longbeans
Shrimps

Sauce for chicken: 
1Tbsp sesame oil, 2Tbsp light soy sauce, 1Tbsp huatiao and pepper + 1/2 bowl hot water

Sauce for longbeans:
1Tbsp sesame oil, 1Tbsp oyster sauce, 1tsp light soy sauce and pepper + 1/2 bowl hot water

1) Wash and rinse chicken leg then rub salt for 30mins then rinse away and pat dry. Cut some slits on chicken so that it is easier to cook. 
2) Wash 2 cups of rice and put 1:1 ratio rice to water, place chicken leg, pandan leaves, garlic and ginger on top. (Use the deeper dish for this) 
3) Wash and cut stingray into smaller cubes and put it in the tray. Arrange shrimps, tomato and ginger then pour assam sauce over. 
4) Wash and prepare longbeans then place in last tray. Layer prawns neatly on top. Drizzle sauce over long beans.
5) Add 3 cups of water. Close all with the stingray at bottom, followed by chicken rice then longbeans on the top. Pressure cook on Hi x 8mins and let it natural release for 15mins. 
6) Meanwhile prepare sauces for chicken. Drizzle sauce over chicken before serving. Bon Apettit
 

Monday, April 19, 2021

Foodi Hack: 2 Dish 1 Rice


Another easy hack with the tingkat style cooking! Total love this as I can jus dump them in then leave it to keep warm til time to eat ❤️ 


Rice with steam eggs, steam fish head! Yum yum esp since the steamed egg is so smooth and 🤤🤤🤤 Stay tune as I gonna make use of this toy more often for lunches or dinner 😍

Steamed Egg
3 Eggs
1cup water
Pepper
Drizzle few drops of fish gravy or 1tsp chicken powder 
1tsp sesame oil

Steamed Fish Head
1 Fish head
Tomatoes slices
Ginger slices
1tbsp huatiao
1tbsp seaame oil
1tbsp light soy
pepper
*optional: 1tsp black beans 

1) Beat eggs gently with fish gravy/chicken powder and pepper.
2) Put sesame oil on tingkat. Scoop away bubbles on egg then pour onto tingkat. 
3) Put fish head on another tingkat and place in tomatoes and ginger.
4) Put in seasonings 
5) Lastly add rice to last tingkat, ratio of rice to water is 1:1. 
6) Add 3 cups of water to inner pot. Put in tingkat and use Pressure cook Hi x6mins. Natural release til time to serve ❤️

#priscillacooks #tingkat #throwback 

Cheeseburger Prata


 FHFL cos my gal jus told me over dinner last nite that she got stay back for oral test today. Decided to shift their school menu and added in this Cheeseburger Prata! 


Lazy to dig buns so last min so gotta hide it inside the prata. Easy and not messy to eat in school as well! Win-win! Only downside is I wished I could have squeeze a bit more sauce lol! So tip is, a bit more sauce than my picture! But fret not, the patty is still juicy and soft, just that I wld prefer a bit more sauce! 


Very easy to put together as per above video and definitely very yummy with the crispy crust and yummy beef + cheese combo! Do try it and let me know what you think of it! 


Ready for school ❤️

Cheeseburger Prata
2 Prata skin
1 Beef patty
1 Burger cheddar
Tonkatsu sauce

1) Cut prata skin, beef patty and cheddar into 4s
2) Place beef patty then cheese and drizzle tonkatsu sauce on each of them. Cover up with another prata skin and close them lightly
3) Fold in edges of each quarters tightly
Tips: Best to do it night before so easier to handle and I feel it bakes better IMO
4) Bake 180deg x 15mins

Sunday, April 18, 2021

Homemade Chicken Stock


Decided to make chicken stock for usage thru the week but i didnt add any vegetables nor salt as I wan to be able to tweak and adjust based on my meal plans. 

And since I am making chicken stock, I decided to use the stock for Wanton mee cos the oldest prefer soup noodles than dry tossed noodles. This is the 2 boys’ favourite and secondborn asked for 2nd helping which is rare 😍


We even had dry tossed wantons and wanton soup! Lightly seasoned with some fish gravy, pepper and shallot oil. Love it! 


The chicken stock definitely never goes to waste! Had it for lunch and packed for emergency use. Had included my wanton filling recipe below too! 


Homemade Chicken Stock
2 Chicken carass
20-30 Chicken feets
2 Garlic
1 Ginger, thick pc

Water, Approx 14cups (Jus enough to submerge the bones)

1) Blanch chicken feets and carass then rinse and set aside
2) Place chicken feets, carass, garlic and ginger then fill enough water to submerge ingredients. (About 14cups mark for mine)
3) Pressure cook Hi x 1hour then natural release. Cool before storing in fridge.

Wantons
1packet wanton skin
200g minced chicken
150g shrimp paste
1Tbsp sesame oil
1Tbsp huatiao
2.5Tbsp light soy sauce
Pepper

1) Mix and wrap with wanton skin
2) Boil til cooked and serve with noodles either dry or soup as preferred

Saturday, April 17, 2021

Foodi Hack: 2 Dish 1 Rice


YAY TO NEW TOY! OMG! Now i know why its game changer!!! Total ❤️! This is great for lazy nights yet when you want homecooked food! 

I would say the combination of Ninjafoodi and this special
rack is life saviour! Simple prepare ahead, pop all in when you are back from home or ready to eat, all it takes is 20mins max! How not to be so amazingly pleased with this! To the person who came up with this hack, THANK YOU SO MUCH! So going to find more recipes that can accomodate to this style of cooking! 


And since I am home with extra time to
spare, lets stirfry a plate of greens to go along for dinner ❤️
 

Sharing my simple dishes for tonite!! 

Mushroom Oyster Chicken
2 Chicken leg, chopped
4shitake mushroom
ginger
2Tbsp oyster sauce
1tsp Huatiao
Pepper

Steam Cod Steak
3 Cod steak
Ginger
Tomato
1Tbsp sesame oil
1Tbsp Huatiao
1Tbsp Light soy sauce

Rice is 1:1 water ratio

1) Prepare dishes on plate seperately with seasoning. 
2) Stack chicken on the bottom, followed by fish then rice. 
3) Add 3 cups of water into pot and put in tingkat of food inside.
4) Pressure cook mode Hi x 6mins then natural release til time to serve (Approx 20mins)

Chocolate Chips Scones


Out for the morning til late afternoon and since dinner is gonna be an easy meal so I took some time off to make some scones for breakfast next day ❤️ 

Saw this recipe that a fren did and posted and it looks really good. Decided to make some to try. And since I wan to offer to the kids, I decided not to make earl grey but to add in some chocolate chips. 😋 All-time fav is chocolate for me! 


Texture is crunchy on the outside yet fluffy on the inside. Its not overly sweet and I can taste the bitterness of my dark choc chips! Love it!! 


Easily mix up the scones dough in a short 15mins or less. Chill for 30mins before cutting them up and bake. Great for impromptu tea time snack too! Do try it and come up with your own favourite flavours. 

 
Chocolate chips scones (adapted from korean scone boy)
200g Cake flour
30g Sugar
4g Baking powder
2g Salt
70g Butter 
60g Milk (added 1tsp homemade vanilla extract)

Chocolate chips, optional

1) Sieve flour and add in dry ingredients and give it a stir
2) Rub in butter til it resemblences breadcrumbs. 
3) Add in milk and mix it til it forms a dough. Cut into halve, stack on top and press down and repeat 2-3 more times. Chill for 30mins
4) Roll out chilled dough and cut into desired shapes. Brush with milk. Bake at 180deg x 20mins.
Serve with your favourite coffee, jam and butter ❤️ 

Friday, April 16, 2021

Fusilli & Cheese (Baked version)


Always wanted to try this after seeing many versions of this in my instagram. Finally decided to try this today for dinner as mummy on low batt mode. Jus serving this as carbs for the kids along with grill steak and salad. Simple dinner for everyone. Gonna keep this post short and share this wonderful recipe here 😉


Our simpe dinner ❤️

 
Tips: To cover fully with milk when baking and also to add more milk if it dries up after baking. Serve it straight out once it is out frm baking. 


This is how easy it is, no involvement and all it took is 30mins for a warm cheesy fusilli! Yummy ❤️
 
Fusilli & Cheese (Baked Version)
2/3cup Fusilli
100g Cheddar
Milk (enough to cover fusilli)
Mozerella cheese (to sprinkle on top)

Grated parmesan 
Parsley flakes
Some salt to taste, optional

1) Greased baking pan. Put cheddar block in middle and sprinkle fusilli all around.
2) Pour milk to cover the top of fusilli. Sprinkle mozerella cheese to cover the top and bake at 160deg x30mins.
3) Halfway baking (after 15mins) stir thru fusilli and continue baking at 140deg. 
4) Stir in grated parmesan and parsley flakes once it is ready. Serve with choice of sides ❤️ 

Thursday, April 15, 2021

Bacon Risotto (Pressure Cook)


Always wanted to try Risotto but as I had to cook them over stove top, I wasnt that confident. And since now I had Ninja, which I can make use of the pressure cook function so I thought I would try it once and see how it goes with the kids! 

Its quite straightforward and fast as only need to dump in to saute the bacon then add in rice to toast before i add in water and send it for sauna. All in total took me about 20minutes max from start to end. And kids get a flask of risotto for school. Shall see how it goes with my fussy gal at the end of school and update. (Oh and it may dry out as u continue to keep it warm in the thermos, I actually let it cool slightly before closing the lid.) 


Attached a simple video of the cooking process ❤️


Bacon Risotto (Pressure Cook)
1 cup rice
1 cup bacon, strips
3cloves garlic
1Tbsp butter
3cup water

1/2cup Grated parmesan
Parsley flakes
1Tbsp Diced tomato
3Tbsp milk
Pinch of pink salt

1) Saute mode Hi: Fry bacon til crispy then add in garlic and butter. 
2) Add in rice and fry til slightly toasted and browned
3) Add in water and Pressure cook Hi x 7mins and natural release for 10mins.
4) Quick release and stir grated parmesan and parsley flake thru rice. Add in diced tomato, milk and salt to taste. Serve warm